Want to build your dream treehouse? Here are the ultimate tips and plans to ensure your treehouse is sturdy, safe, and a fun addition to your backyard.
Planning Your Treehouse
This week, the focus is on building a modern treehouse. The goal is to set aside all other projects and build a treehouse.
Here’s the plan:
- Screw two-by-sixes between three strong sturdy trees.
- Build a 2×6 floor and put it on top of the tie ends.
- Build wall trusses out of two by six and two by fours and bring those up to the platform.
- Tie it all in with two by fours and two by sixes.
- Add cedar siding.
- Put two by fours on top to create overhangs and support a tin roof.
Constructing the Base
Three healthy trees were found near the house. A two by six was taken, and lag screws and a level were used to attach it to the trees. This was repeated to create a triangle between the trees. The basic frame was put up on top of the treehouse platform, but not all the joists were added because it was not very heavy at this point. Now, all the joists will be slid and then attached in place.
The reason that this floor frame was built the way that it was is it gives something square to work off of. So it’s really easy to build a nice square treehouse even if the trees are irregular. It’s important to make sure things are square. To do that, take opposite diagonals, then adjust.
For the plywood, scraps leftover from the workshop are being used. The plywood helps square up the platform and is then screwed down with screws.

Reinforcing the Platform
While someone works on the subfloor, cross place the platform back to one of the trees. Lag screws are used into the tree and screwed to the base of the platform at a 45 degrees. A 2×4 seemed plenty strong enough, but if you could do it again, a 2 by 6 would probably be used. This really helps strengthen the platform. The treehouse platform is all done, and the walls are next.
Assembling the Walls
It’s still raining out, so the wall trusses will be assembled in the garage floor. A miter saw is used to cut the angles out for the wall trusses.
Everything is laid out on a flat level spot in the garage. Two-and-a-half inch deck screws are used to attach everything together. Once one of the wall trusses was completed, it was used as a pattern to create the other three wall trusses, that way they’re all identical. Then the four wall trusses were hauled out to the tree fort location, and they’re nice and lightweight, so they were handed right up to the platform and started tying them together with two by fours and two by sixes. The framing went up in a matter of minutes.
Adding Cedar Siding and Deck
The four walls that were pre-built in the garage are all stood up, and the cedar siding will be added to the outside. Cedar fence pickets are being used; they’re about two dollars a board. About 30 of them are needed, so it only costs about sixty bucks. It’s lightweight, it’s weather resistant, you don’t need to finish it, and it smells really great, so we’re going to start putting it up.
Working on this treehouse is enjoyable because most if not all of the work can be done from inside. Notice that a big extension ladder was never used for any of the exterior work.
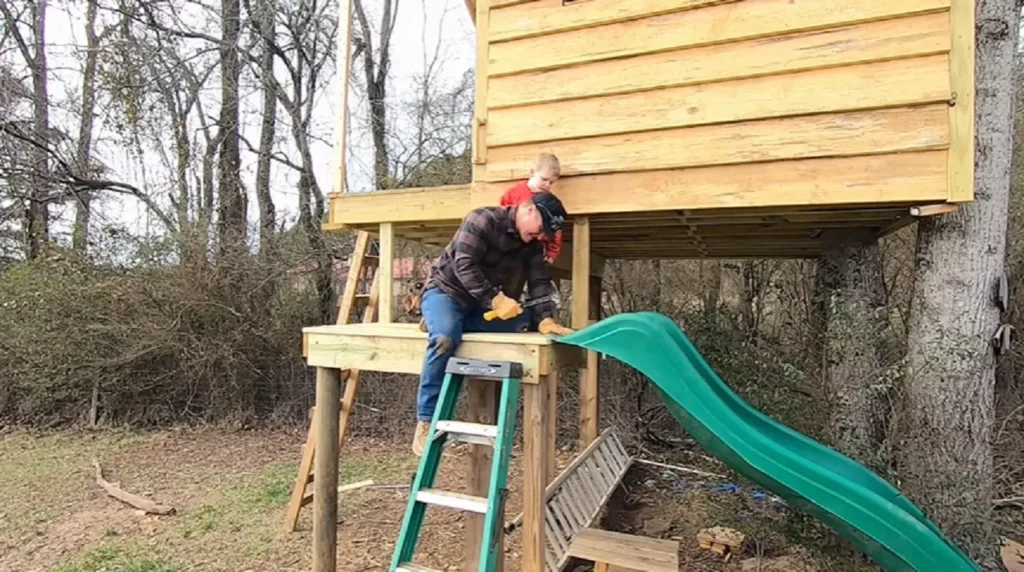
Now, a little deck will be added on the front of the treehouse. Some leftover decking boards were available and those were run a little long, chalked to line, and cut everything off. For the ladder, two two by fours were taken and screw them level to the front of the deck and ran those long, and then ladder rungs are added in between the two two by fours. To create the railings, the top of the ladder boards were cut off with a level, and then two by fours were tied into the ends of the ladder and the trees. A drill, a level, and a circular saw are your friends here.
Finishing the Roof
Something is needed to support the tin on the roof and also to create some overhangs on the sides. So what’s being done is attaching two by fours to the top with an overhang of about six inches on each side. These are screwed right to the wall trusses. The ten has arrived and this is the last step.
Final Touches
There wasn’t actually a lot of work to do . The kids were crazy and they’re just so excited about the Playhouse that it was hard to get out of it, so the kids are at school right now. There’s a tree at the back of the playhouse so it’s being chopped out with Finn snips. It was a challenge building this project because it’s out in the woods so everything has to be hauled in by an APD, there is a one-year-old, and a whole pack of kids that were so excited about the treehouse they were really in the way. It was attempted to make it fun somehow, and it happened.