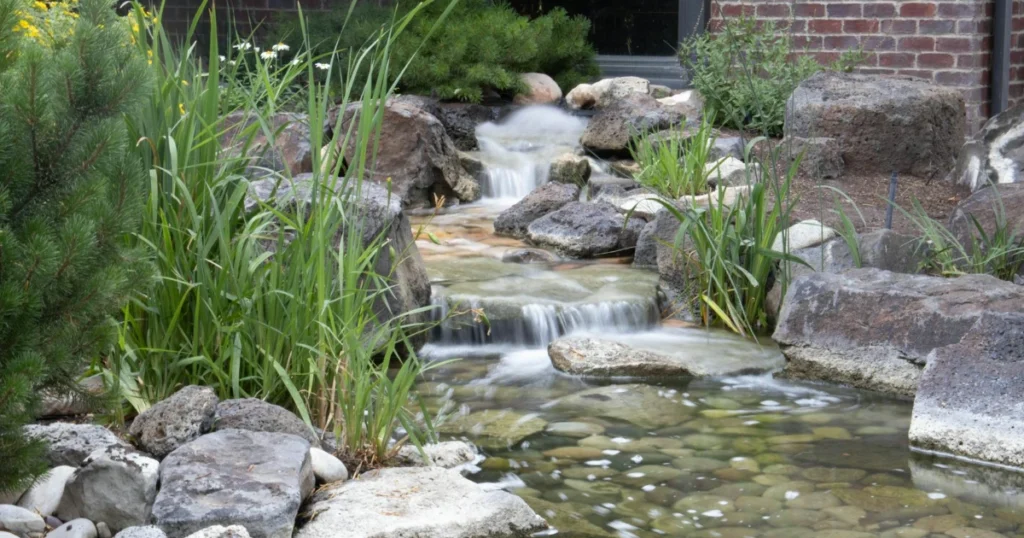
Would you be interested in transforming your outdoor space? An Aquascape DIY backyard waterfall kit can be a great weekend project and a beautiful way to enhance your outdoor living area.
Creating a beautiful backyard waterfall can be a great weekend project when using an Aquascape DIY backyard waterfall kit. The first step in building a waterfall is to determine an appropriate location for the new feature. Once a location is determined, mark out the area for the reservoir Basin that will hold the water to be recirculated over the new waterfall.
The blocks will make room for the water in the system and support the Decorative Stone at the base of the disappearing waterfall.
Assembling the Aqua Blocks
Place one of the two large panels on the ground. Evenly distribute and connect the four small panels as shown. Attach the second large panel on the opposite side of the first. Complete the assembly by securing the two side panels to the back and front sides of the module.
Place the pondless waterfall Vault and aqua blocks on the ground for reference. Outline the components with brightly colored spray paint, leaving a 6-in buffer for ease of installation. Dig the space to a depth of 18 in. The excavated soil can be used to help build up the waterfall area or used to create a planting bed. Use a flathead shovel to carve straight Walls Within the Basin. Prepare a separate cavity for the pondless waterfall Vault to sit 8 in lower than the Shelf created for the aqua blocks. Be sure to tamp the Basin floor to create a level base for the components. Make sure the vertical walls are cut straight to avoid obstructions.
Now that the Basin is excavated, place the units into the Basin to check for proper fit. The aqua block should sit Level side by side on the Basin Shelf with one block extending over and resting on the foot of the pondless waterfall Vault. With the excavation complete and the water basin created, the components can be temporarily removed from the Basin. The under layment and liner can then be installed.
Installing the Underlayment and Liner
Install the rubber liner the same way. Be sure the excess material is brought to one corner of the Basin where the waterfall is intended to be built.
Once the liner is set, the Basin components can be placed back into position on top of the liner. Wrap the system by folding the liner and underlayment over the top of the Basin components. Proceed to backfill around the entire perimeter of the Basin with loose soil or sand. This will help lock the Vault and aqua blocks in place and avoid any shifting over time. While the liner is folded back, dig a trench to accommodate the kink-free hose that will connect the pondless waterfall Vault to the waterfall spillway.
This is also a good time to excavate an area for the waterfall that will fall into the Basin. The waterfall Spillway is a diffuser that will make it easier to create the waterfall. Once the waterfall area has been prepared, unfold the liner. Set a few larger rocks on top of the aqua blocks to frame out the waterfall. Retain the dirt on the back side of the Basin.
Connecting the Plumbing
Install the pump into the pondless waterfall Vault and hook up the plumbing. Attach the threaded Barb fitting to the kingree hose with the metal clamp provided. Run it through the side discharge port to connect the plumbing to the pump below. The hose can then be laid into the excavated pipe trench and stabilized in the Basin with gravel around the pondless waterfall Vault. Use a scrap piece of underlayment around the pipe discharge port to prevent any gravel from falling into the component. Finish securing the pipe with rock work. Make sure the area where the hose exits the Basin is built up with dirt to avoid forming a low Edge that could cause a leak.
Back fill the pipe trench with loose soil. Prepare the waterfallen Stream area by carving out a path in the burm. The use of a waterfall spillway provides a perfect starting point for building a natural-looking waterfall. In preparation for setting the spillway, excavate a flat area in the BM and Tamp it down to prevent settling. Fold the liner back and place framing rocks in the Stream. Use gravel to build the up and level the spillway. Continue building the waterfalling stream with rocks of various sizes.
Install the adapter and once again tighten it down with channel lock players. A couple turns past hand tight should do the trick. Connect the kingree hose of the Barb fitting. Secure the connection with the use of the metal clamp provided. If connecting the host to the Barb fitting proves to be too difficult, soften the pipe by submerging it in warm water or heating it with a hair dryer. Once the plumbing is connected, wrap the liner around the spillway unit and backfill the area with loose soil.
Final Touches
Use a flat stone to help blend the spillway into the landscape edging. Bring in water-loving plants to help naturalize it. Using waterfall foam will improve the aesthetics of the waterfall by filling in the gaps between the Rocks where water would naturally be lost. Apply the expandable foam into the joints between the waterfall spillway and the framing rocks. Apply it to the base of any Stones along the stream in a waterfall where the goal is to divert the water from disappearing behind the rock work. Wait 15 to 20 minutes for the outer shell of the foam to harden before molding it down. Use gravel to disguise it.
Complete waterfall construction by adding gravel to the stream bed. Add the finishing touches by setting accent Stones around the perimeter of the basin. Once the accent stones are set, the excess liner can be trimmed and work can be done on the edging. Use different types of edge treatments to help naturalize the water feature.
A gravel Edge can be done by trenching the liner around the perimeter of the Basin. Back fill the area with stone. A dirt Edge involves folding the liner back behind the perimeter of the rocks. Back filling the area with soil and eventually mulch. Fill the Basin with water.
Transforming an outdoor living space with a DIY backyard waterfall kit offers an easy way to add beauty and tranquility. By following these steps, a stunning water feature can be created, enhancing any backyard environment.